To get back to the main page, click here.
To view the list of image building, click here.
To view the detailed graphic guides, click here.
To view extra manuals about xUbuntu, click here.
Guideline for using DGX
As a DGX user, you could:
- Acquire the authority of
docker, including:- Building, inspecting, committing, pulling, pushing, or deleting docker images.
- Running, or stopping any docker container.
- Configuring the docker parameters in your user space.
- Acquire the full authority by
sudoinside any docker image. - Upload, or download files in
~,/raid/<your-name>,/raid/shared/ - Use
sudo chown,sudo chgrp,sudo chownto maintain the permission of your files.
Although you are added to the sudo list, you should not do the following things, because modifying the device outside the docker container may cause the device to collapse.
- You should not use
sudo aptto upgrade, install or remove any package outside the docker container. - You should not modify any files that are not owned by you, especially the system-related files. (However, modifying any files inside the docker container is allowed)
- You should not use
sudoin any case that is not listed before. - You should not use, or commit any image that is tagged as others’ private images.
If you find any bugs or want to add any features, please contact the maintainer, unless you are very confident about what you will do.
Documentation for currently built images (xUbuntu)
Updated on 4/20/2022
Here I am maintaining a list of currently built docker images on our DGX-230. Most of them are built based on:
Usage: first launch
![]() Please pay attention to this section. This feature is first introduced in
Please pay attention to this section. This feature is first introduced in 1.6 version. To avoid authority issues, any user who intends to use the VNC desktop needs to use the following method to register the user id and VNC password for the first time.
When using this image for the first time, users need to run the following command. Only the image name and tag need to be changed according to the needs.
docker run --gpus all -it --rm xubuntu:1.0 uid=$(id -u) gid=$(id -g)
The image would ask users to configure the VNC password. After that, the image would suggest committing the image by a command like this:
docker commit --change='CMD [""]' <container-id> <new-image-name>:<tag>
The saved image should be only used by one user because the user id has been registered inside the image.
Usage: graphic guides
For those amateurs, I have provided graphical guides for the whole workflow of working with a new image and saving it. Check the following links:
To view the detailed graphic guides, click here ![]() .
.
- Make you able to run
docker pullfor any NVIDIA images
- How to work with a new image, and save it

- How to save an image with the bash window lost

Usage: interactive mode
The basic usage for any of the following images could be divided into 4 cases:
-
By built-in
noVNC: In default mode, you just need to launch the built image by:docker run --gpus all -it --rm --shm-size=1g -v ~:/homelocal -p 6080:6080 xubuntu:1.0The above command is the equivalent to
docker run --gpus all -it --rm --shm-size=1g -v ~:/homelocal -p 6080:6080 xubuntu:1.0 --vncThis option would force the image to launch the VNC server.
The following command would force the VNC to launch in the
rootmode.docker run --gpus all -it --rm --shm-size=1g -v ~:/homelocal -p 6080:6080 xubuntu:1.0 --rootIn the current version, users could use either
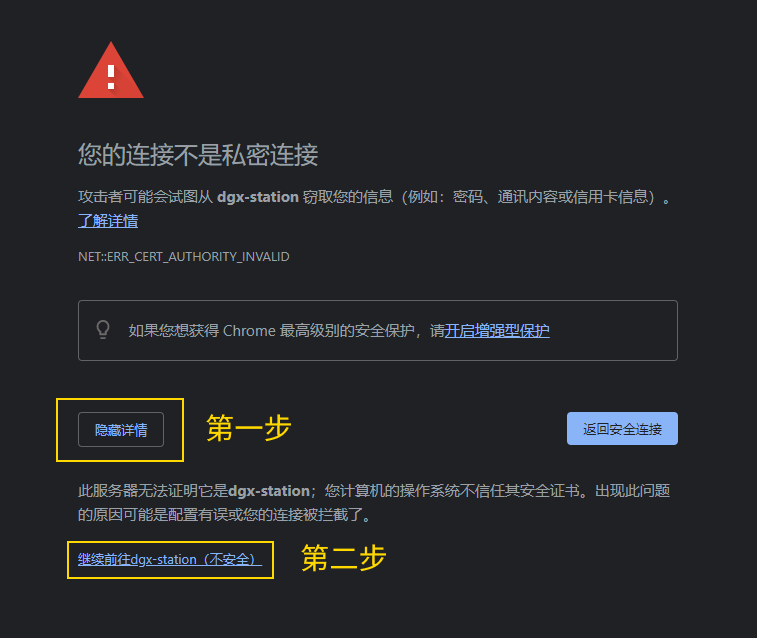
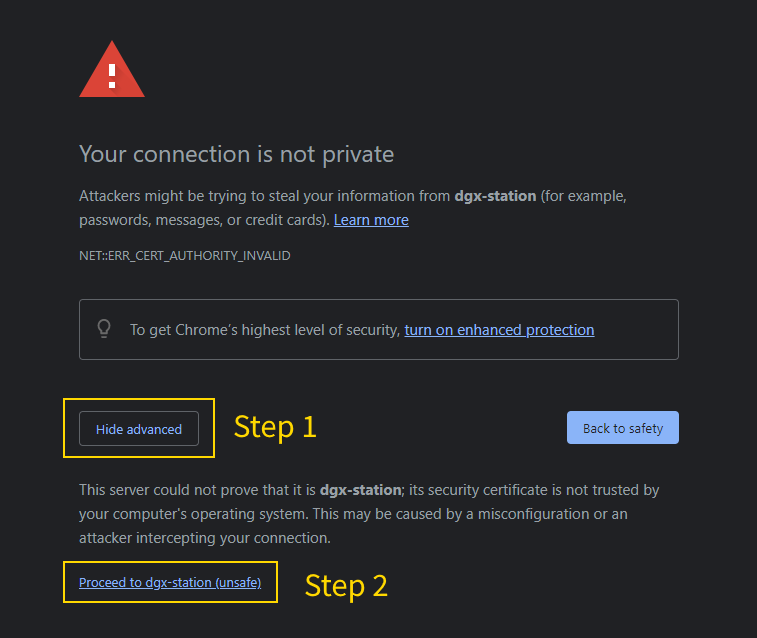
httpto get access to the unencrypted noVNC session orhttpsto get access to the ssl-encrypted noVNC session. For users who open the encrypted session first, they may need to add the noVNC site to the trusted list. Here we show an example of how to do that in Chrome. First, we need to addhttps://at the beginning of our accessed address. Then we could check the following figures:登录有SSL保护的noVNC Login with noVNC protected by SSL 

-
By external VNC viewer: If you have installed a VNC viewer on your client side, and want to connect the VNC server of the image directly, please use:
docker run --gpus all -it --rm --shm-size=1g -v ~:/homelocal -p 5901:5901 xubuntu:1.0 -
By
Jupyter Lab: If you want to launch the Jupyter Lab but do not start the desktop, please usedocker run --gpus all -it --rm --shm-size=1g -v ~:/homelocal -p 6080:6080 xubuntu:1.0 --jlab jlab_password=openjupyter jlab_rootdir=/homelocalThe
jlab_passwordwould override the default random token. Thejlab_rootdiris the root folder of the launched jupyter lab. If not setjlab_rootdir, the default root folder would be/homelocal. The--jlaboption is required when you need to force the image to switch to Jupyter Lab mode. -
By
BASH: If you want to enter the command line but do not start the desktop, please usedocker run --gpus all -it --rm --shm-size=1g -v ~:/homelocal xubuntu:1.0 --bash -
By any script: If you want to run any script inside the docker for only one time, please use
docker run --gpus all -it --rm --shm-size=1g -v ~:/homelocal xubuntu:1.0 script=<the-path-to-your-script>
Note:
It is not required to launch noVNC separately for the newly released images. Because the noVNC has been built into the images. If we use
-p xxxx:6080to launch our image, we only need to open our browser and use the following address:http://<dgx-230-ip>:xxxx/vnc.html?host=<dgx-230-ip>&port=xxxxIf you want to connect the VNC in encrypt mode, please use:
https://<dgx-230-ip\>:xxxx/vnc.html?host=<dgx-230-ip>&port=xxxxHere is a tip: the configs after
vnc.htmlcould be omitted if you only need to get access to your own desktop.
Usage: backend mode
If you want your container to run on the backend rather than interactively, please change -it to -dit. However, this option should be only used when you are working with programs running on the backend, like the VNC server. For example:
docker run --gpus all -dit --rm --shm-size=1g -v ~:/homelocal -p 6080:6080 xubuntu:1.0
docker run --gpus all -dit --rm --shm-size=1g -v ~:/homelocal -p 5901:5901 xubuntu:1.0
In this case, unless you use docker kill or docker stop to terminate your container, the container would be kept running.
Note:
The backend mode should not be launched by the released images directly, because those images would require users to set a password when first opening the container. Users should set their passwords, save the image separately, and then could use the backend mode to launch their own images.
Usage: save the image
When you want to save your image, follow the instructions below:
-
(This step is confirmed to be unnecessary.)
Logout from your desktop by clicking the menu on the right top corner of the desktop. - Hit Ctrl+C on your interactive terminal. This operation would terminate noVNC. You will see the
websockifyof noVNC is interrupted. -
Use the following command to terminate the VNC server:
tigervncserver -kill :1 -
Open another terminal. In that terminal, you should be outside of the image, use the following command to save your current container as a new image:
docker commit <container-id> <image-name>:<tag>The
<image-name>and<tag>could be determined by yourself. However,<container-id>should be found on your container-side terminal, it should follow the user name of your bash, like this:xubuntu@<container-id>: $or this (in root mode):
root@<container-id>: #
Note 1: If you are saving a container launched with options (for example,
docker run ... xubuntu:1.0 --bash), you need to use the following command to save the image with the options flushed:docker commit --change='CMD [""]' <container-id> <image-name>:<tag>If you do not add the option, your launching options would be remembered in your new image.
Note 2:
In any case when you launch your container by backend mode (with option
-dit), you should not commit your image, because you could not kill yourtigervncserverwithout the interactive shell.
Usage: more usages
Since ver 1.7
![]() The following new features are firstly implemented in ver 1.7 desktop. Check the links to learn details.
The following new features are firstly implemented in ver 1.7 desktop. Check the links to learn details.
- File transfer: How to use FileBrowser

- File transfer: How to use Cloudreve (experimental)


- Technique: How to use
sudo
- Technique: How to use
mamba
- Technique: How to configure
oh-my-posh
- Quick script: The command
set-bing-wallpaper
- Quick script: The command
yjin-tool
- Quick script: The command
xvnc-launch(experimental)

Since ver 1.6
Documentation for currently built images (Jupyter Lab)
Updated on 1/16/2021
Here I am maintaining a list of currently built docker images on our DGX-230. Most of them are built based on:
Usage: interactive mode
The basic usage for any of the following images could be divided into 4 cases:
-
By built-in
Jupyter Lab: In default mode, you just need to launch the built image by:docker run --gpus all -it --rm --shm-size=1g -v ~:/homelocal jlab:1.0 -p 6080:6080 password=openjupyter rootdir=/homelocalThe
passwordwould override the default random token. Therootdiris the root folder of the launched jupyter lab. If not setrootdir, the default root folder would be/homelocal. You could also add the--jlabflag. The--jlabflag is required when you need to force the image to switch to Jupyter Lab mode. -
By
BASH: If you want to enter the command line but do not start the desktop, please usedocker run --gpus all -it --rm --shm-size=1g -v ~:/homelocal jlab:1.0 --bash -
By any script: If you want to run any script inside the docker for only one time, please use
docker run --gpus all -it --rm --shm-size=1g -v ~:/homelocal jlab:1.0 script=<the-path-to-your-script>
Note:
If you start your container with a configured password, you could open the following address directly and fill in your password:
http://<dgx-230-ip>:xxxxWhen you start your container without configuring the password, you would still be asked for a token, which would be shown in your terminal. In this case, we could use this address to skip the step for filling in the token:
http://<dgx-230-ip>:xxxx/?token=<token-from-the-terminal>
Usage: backend mode
If you want your container to run on the backend rather than interactively, please change -it to -dit. However, this option could be directly used for the released image. You do not need to save your own image first. For example:
docker run --gpus all -dit --rm --shm-size=1g -v ~:/homelocal -p 6080:6080 jlab:1.0 password=....
In this case, unless you use docker kill or docker stop to terminate your container, the container would be kept running.
Note:
When starting your container without setting the password, do not use the backend mode, because you will be asked for a token instead of the password, but you could only find the token from the terminal in this case.
Usage: save the image
When you want to save your image, follow the instructions below:
- Hit Ctrl+C on your interactive terminal. This operation would terminate
Jupyter Lab. -
Open another terminal. In that terminal, you should be outside of the image, use the following command to save your current container as a new image:
docker commit <container-id> <image-name>:<tag>The
<image-name>and<tag>could be determined by yourself. However,<container-id>should be found on your container-side terminal, it should follow the user name of your bash, like:root@<container-id>: #
Note 1: If you are saving a container launched with options (for example,
docker run ... jlab:1.0 --bash), you need to use the following command to save the image with the options flushed:docker commit --change='CMD [""]' <container-id> <image-name>:<tag>If you do not add the option, your launching options would be remembered in your new image.
Note 2:
In any case when you launch your container by backend mode (with option
-dit), you should not commit your image, because you could not kill yourjupyterlabwithout the interactive shell.